Logging a Facilities Issue
There is a dedicate LiveStax app called Facilities Issue which is used to log facilities issues.
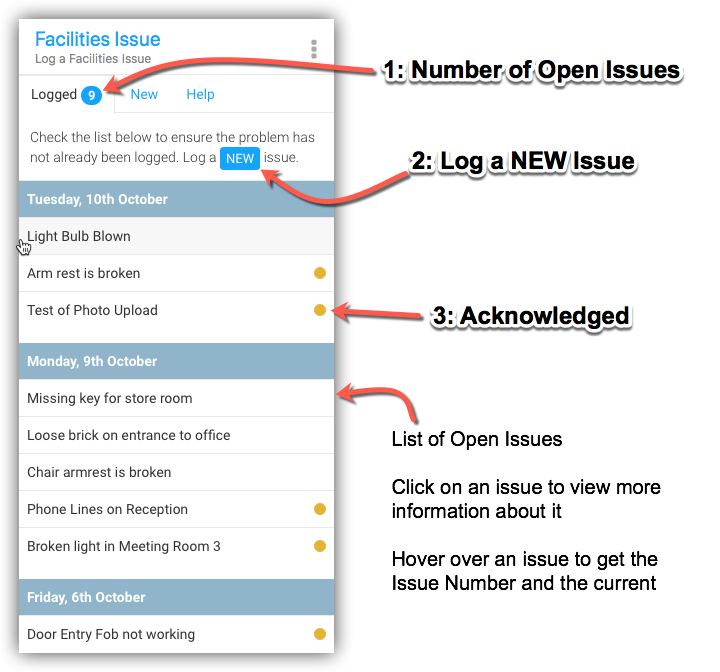
When the app starts, you will be presented with a list of open issues. This is shown so you can check that the issue has not already been logged by someone else. The number alongside the Logged tab title (1) is the number of open facilities issues. In the example shown, there are five.
The list shows the open issues in reverse date order. Those with a yellow dot (3) have been acknowledged by someone in the Facilities Management team. You can hover over the dot to seen the current issue status. If there is no yellow dot, then the issue is still at the logged status.
You can click on any issue in the list to see who logged it, when it was logged and the notes they entered. If you logged the issue (and it’s still at the Logged stage) then you’ll be able to amend or delete it.
To log a new issue, click the NEW button (2). This will take you to the New tab.
Issue Status
When an issue is logged, its status will be Logged
Any issue that is not closed is considered open.
Issues do not have to go through each stage. They can jump around in any direction.
Closed issues can be re-opened (by the FM Team) by just changing the status.
Idealised Flow: Logged → Acknowledged → Under Investigation → In Progress → Closed
Logging a New Facilities Issue
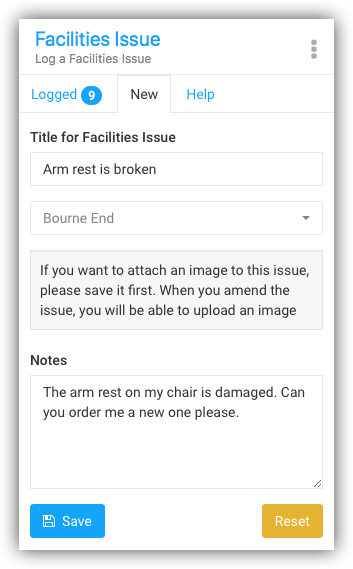
You only need to provide a title (this is what appears in the list), which office is affected and some notes to describe the issue in detail.
The box used to enter the notes starts at five lines, but you can actually enter as much text as required. You can drag the little icon in the bottom-right of the notes box to stretch it to the required size.
When you click the Save button, your issue will be logged and you’ll receive a Issue number. At this point, an email is sent to the Facilities Team.
The Reset button just clears all the fields. This would normally be used when you’ve clicked on an issue in the list to view it, but then you want to log a new call.
Submitting a Photo with the Issue
You may attach a photo (jpeg) to the issue once it has been saved. You may only attach photos to your own issues (those you’ve created). If you do attach a photo, anyone else will be able to see it.
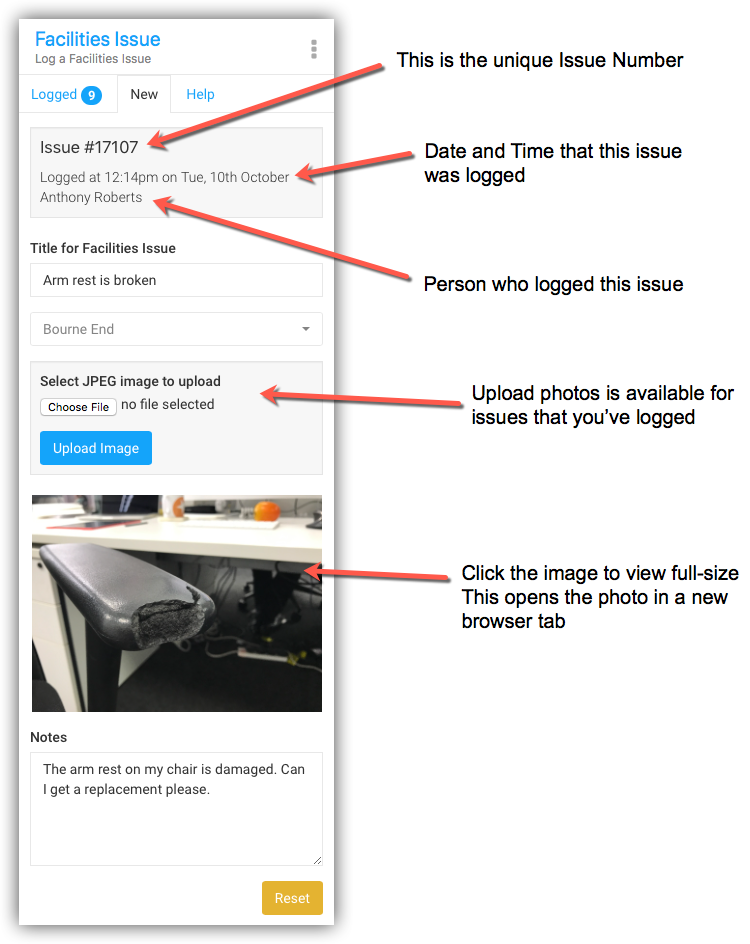
When you click on one of your issues, you’ll see a new section where you can upload an image.
You can only upload JPEG files (photos with a .jpg or .jpeg extension).
After you click the Choose File button, you’ll be presented with a photo upload dialog box that is specific to your operating system. This is different on iMac, Windows, iPad, Android Phone etc.
If you’re using a mobile phone, you’ll probably have the option to take a photo.
Uploads from phones may be orientated incorrectly. If possible, take the photo using landscape mode (hold your phone horizontally).
Once the image has been selected (or photo taken), click the Upload Image button. If successful, you should see your photo appear just above the Notes section.
To view the photo full size, click on it. This will open the picture in a new browser tab and it should be full size.
You can only associate one photo with an issue. If you need to replace the photo, just upload another – it will overwrite the existing file.
Modern cameras generate photos that a many MB in size. To save space on the server, the photo will automatically be resized to 1200px wide. This happens via a background process every hour.